A cook has to clean their kitchen at some point, right?
It’s not just to humor the health inspection
but also to keep things going as fluent and hygienic as possible.
In the world of software engineering, this is no different:
you’ll want to make sure that when you start your day,
your pots and pans are clean.
In this tutorial, we’ll craft a low-cost, cloud-native tool
to keep your Google Cloud projects shiny.
And what’s more, after completing this,
you’ll be able to automate many more tasks using the same toolset!
You can find a ready-to-go version of this setup called ZUNA (Zap Unused and Non-permanent Assets) on GitHub.
Table of Contents
Motivation
When using cloud services, you can create new assets in a breeze.
Even when your project is fully terraformed, you
may still encounter some dirty footprints in your environment.
Maybe it was that one time you quickly had to verify something by
creating a Cloud SQL instance, or those cleanup scripts
that occasionally fail when the integration tests go crazy.
Indeed, a system can fail at any step:
What if the instance running the tests breaks down?
What if an unexpected exception occurs?
What if the network is down?
Any such failure can lead to resources not being cleaned up.
In the end, all these dangling resources will cost you: either in direct resource cost,
or in the form of toil1.
I do recognize that resources not being cleaned up might be the last thing on your mind
when a production setup fails.
Nevertheless, it’s still an essential aspect of maintaining a healthy environment,
whether for development or production purposes.
But don’t let this keep you from building auto-healing production setups!
Deployment Overview
We will create a system responsible for
the automatic cleanup of specific resources in a GCP project.
We can translate this into the following task:
check periodically for labeled resources, and remove them.
Ideally, the system is quick to set up, flexible, and low-cost.
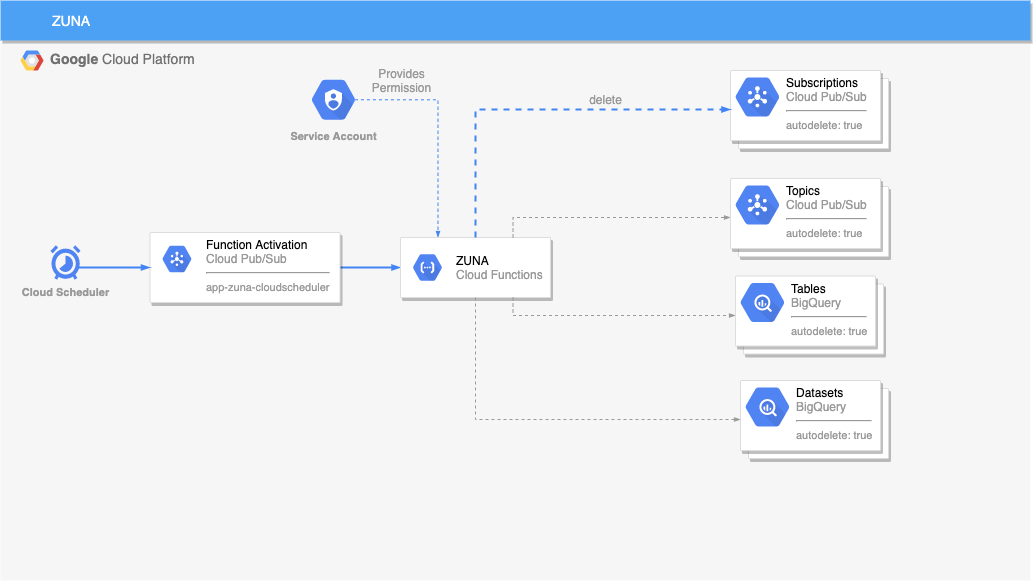
By the end of this post, our setup will look as follows:An overview of the ZUNA setup. In this post, we’ll focus on Pub/Sub Subscriptions.
We will use the following GCP services to achieve this:
Cloud Scheduler: takes care of automation and it will provide us with that literal press-of-the-button for manually triggered cleanups.
Cloud Functions: a serverless Python 3 script to find and delete the GCP resources we’re interested in.
You can easily extend such a script to include new resource types.
Labels: many resources in GCP can be labeled; we’ll use this to mark temporary resources that should be removed periodically.
IAM: we’ll make sure our system adheres to the least privilege principle by using a Service Account with only the required permissions.
Using these services will quickly get you up and running while allowing multiple resources to be added later on.
Moreover, as you’ll see later in this tutorial, this entire solution costs less than $1 per month.
Prerequisites
A GCP project to test this code
Permissions to use the services mentioned above
Bash with the Google SDK (gcloud command) installed (you can also use Cloud Shell)
Building Zuna
We’ll chop this up into multiple steps:
create some resources and attach labels to them
make sure we have permissions to list and remove the resources
craft a script that detects and removes the resources
make the script executable in GCP
trigger the script periodically
optional cleanup
Step 1: Create Resources
First, we create a topic and a subscription so we have something to clean up.
We’ll attach the label autodelete: true, so our script can automatically detect
which resources are up for removal:
When you list the resources, you should see the labels:
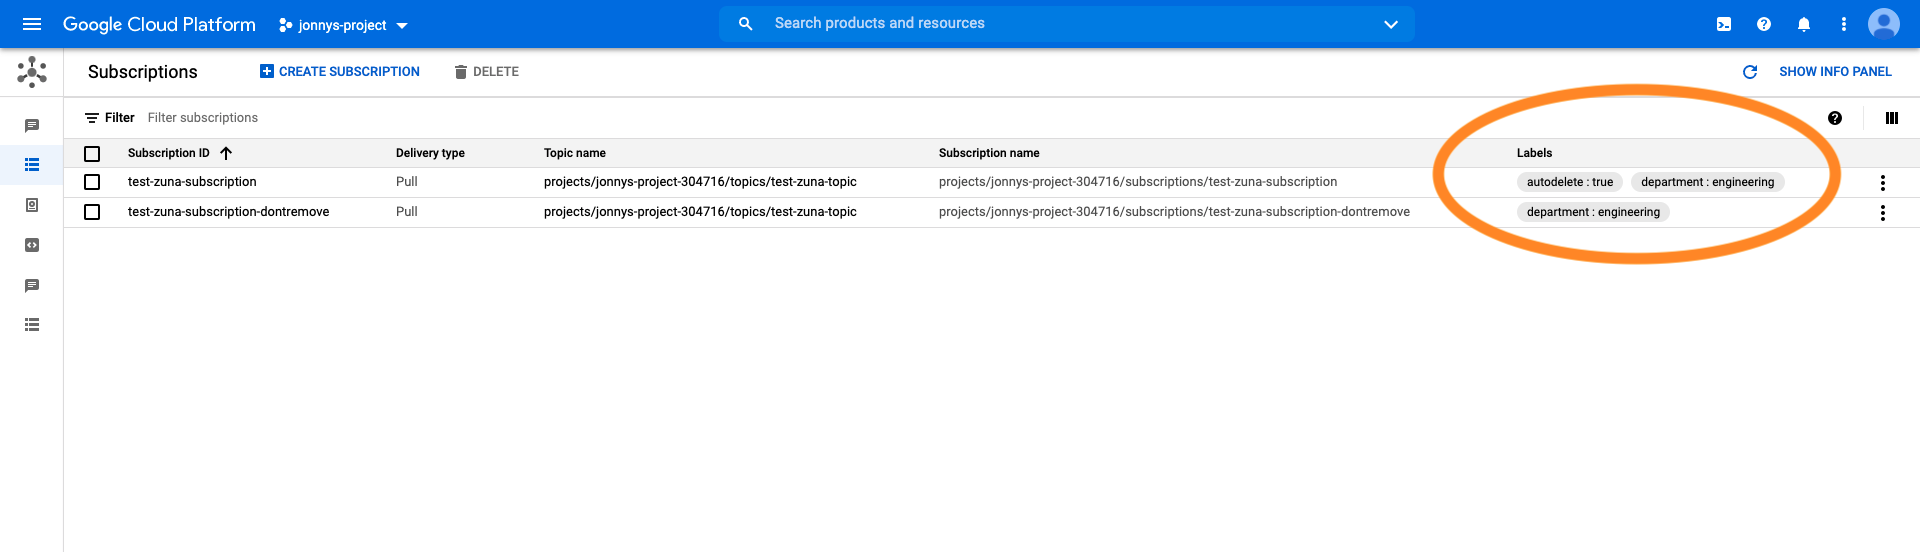
When you go to the cloud console, you should see the label appear on your newly created Pub/Sub subscription:Labels on subscriptions in the Cloud Console.
Alright, we now have a resource that is up for deletion!
When working with real resources, you can either label them manually
or let your resource provisioning script take care of this.
Next up: making sure we have permissions to delete these resources.
Step 2: Get Permission
To facilitate development later on,
it’s best to work with a Service Account from the get-go.
This account will be bound to your script when it executes
and will provide it with the correct permissions to manage (in our case, delete)
the resources.
These commands create a service account that lives in your project (identified by sa-zuna@<your-project-id>.iam.gserviceaccount.com).
Next, it crafts a public-private key pair
of which the private part is downloaded into the file sa-key.json. This file can now
be used to authenticate your script, as we will see in the next section.
First, let’s make sure that we have the correct permissions to list and remove subscriptions.
Create the following file called zuna-role-definition.yaml:
Next, execute the following script:
The script creates a new role, specifically for our application ZUNA, with the two permissions we need.
The role definition lives inside our project (this is important when referencing the role).
Next, the role is assigned to the service account on a project level.
This means that the permissions apply to all the subscription
resources that live inside our project.
It’s also possible to assign pre-defined roles to the service account.
Still, we opt for a specific custom role as the pre-defined ones would
grant unnecessary permissions, e.g., consuming from a subscription.
This way of working is in line with the principle of least privilege.
Step 3: Delete Resources in Python
It is time to remove our resource using a Python script!
You can quickly setup a Python 3 virtual environment as follows:
Now you can create a python file clean_subscriptions.py with the following contents:
Conceptually, the following happens:
the script uses your project id to fetch all the subscriptions in the project
it keeps only the subscriptions based on the label autodelete: true
it attempts to remove all these subscriptions
Note that the actual removal is still disabled for safety reasons.
You can enable it by setting the last line to clean_pubsub_subscriptions(project_id, True).
You can run the script as follows:
Because we make use of Google’s Python client library, we can pass in our service account using the
GOOGLE_APPLICATION_CREDENTIALS environment variable. The script will then automatically
inherit the roles/permissions we assigned to the service account.
The output of the script should resemble the following:
That’s correct: only one of our two subscriptions is up for removal. Now let’s move this
to GCP!
Step 4: Wrap in a Cloud Function
We can easily wrap the previous section’s script in a Cloud Function.
A Cloud Function is a piece of code that can be triggered using an
HTTP endpoint or a Pub/Sub message. We’ll choose the latter as Cloud Scheduler
can directly post messages to Pub/Sub: an ideal combination!
This code should be placed in main.py and is a simple wrapper for our function.
You can test it locally by running python main.py.
You’ll notice from the output that our function from the previous step is executed;
we also reserved some space for future resources (the # TODO lines).
The additional function app_zuna will be the Cloud Function’s entry point.
Currently, it just prints the payload it receives from Pub/Sub and subsequently
calls the cleanup function. This makes it behave similar to the local execution.
Deploying can be done with the following script:
You might want to change the region to something more suitable for your situation.
Several important highlights:
we refer to the Python function app_zuna to make sure this function is called when the Cloud Function is hit
the service account we created earlier is used to execute the Cloud Function;
this means that when our code runs in the cloud, it inherits the permissions assigned to the service account!
the trigger topic refers to a Pub/Sub topic that the Cloud Function will “listen” to;
whenever a message appears on there, the function will process it; the topic is created automatically
the environment variable for the project is included so both local and remote (cloud) versions can operate identically
the timeout is set to 9 minutes, which is the maximum at the time of writing;
we set it this high as removal might take some time in the current non-parallel setup
When you run this script, gcloud will package up your local resources and send them to the cloud.
Note that you can exclude specific resources using the .gcloudignore file, which is created when you run the command the first time.
When the upload completes, a Cloud Function instance is created that will run your code for every message that appears in the
Pub/Sub topic.
In case you get an error that resembles
Cloud Functions API has not been used in project ... before or it is disabled.
you still need to enable the Cloud Functions API in your project.
This can easily be done with the following commands
or using the Cloud Console (see this documentation):
You can easily test the cloud function by sending a message to the newly created Pub/Sub topic:
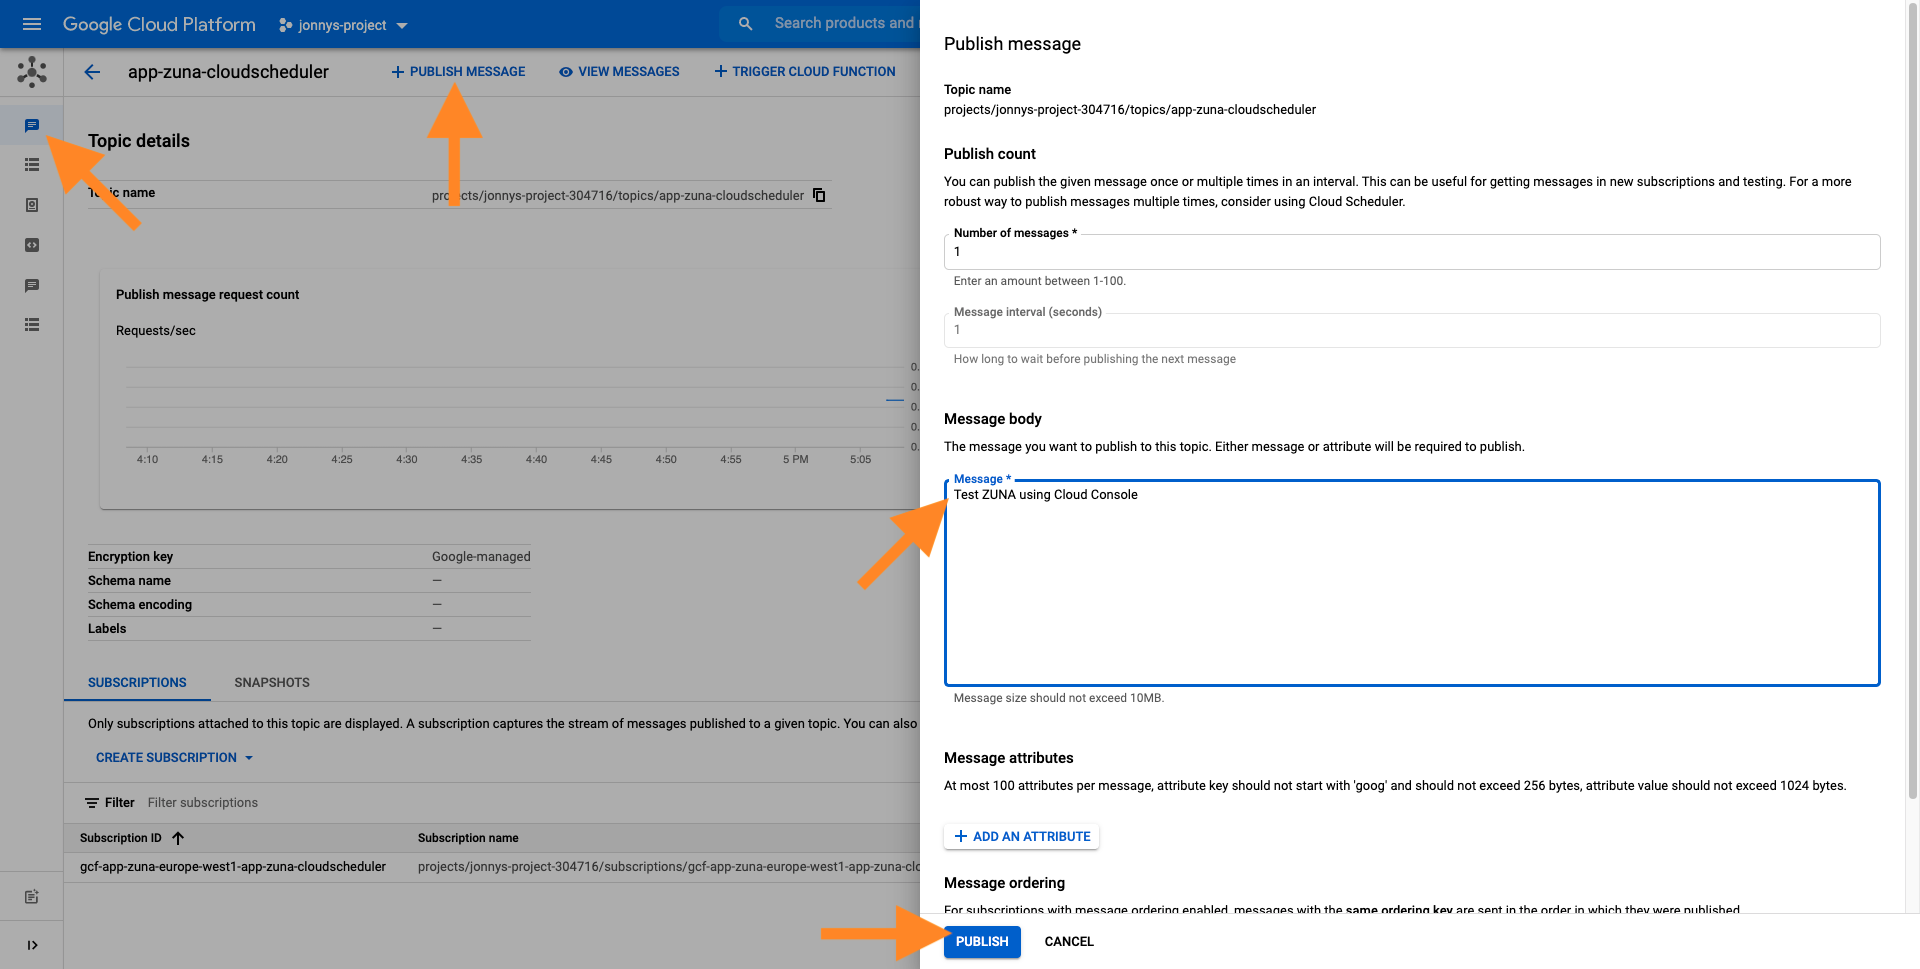
Or in the Cloud Console using the “Publish Message” option directly on the topic:
Send data to the Pub/Sub topic to test the Cloud Function.
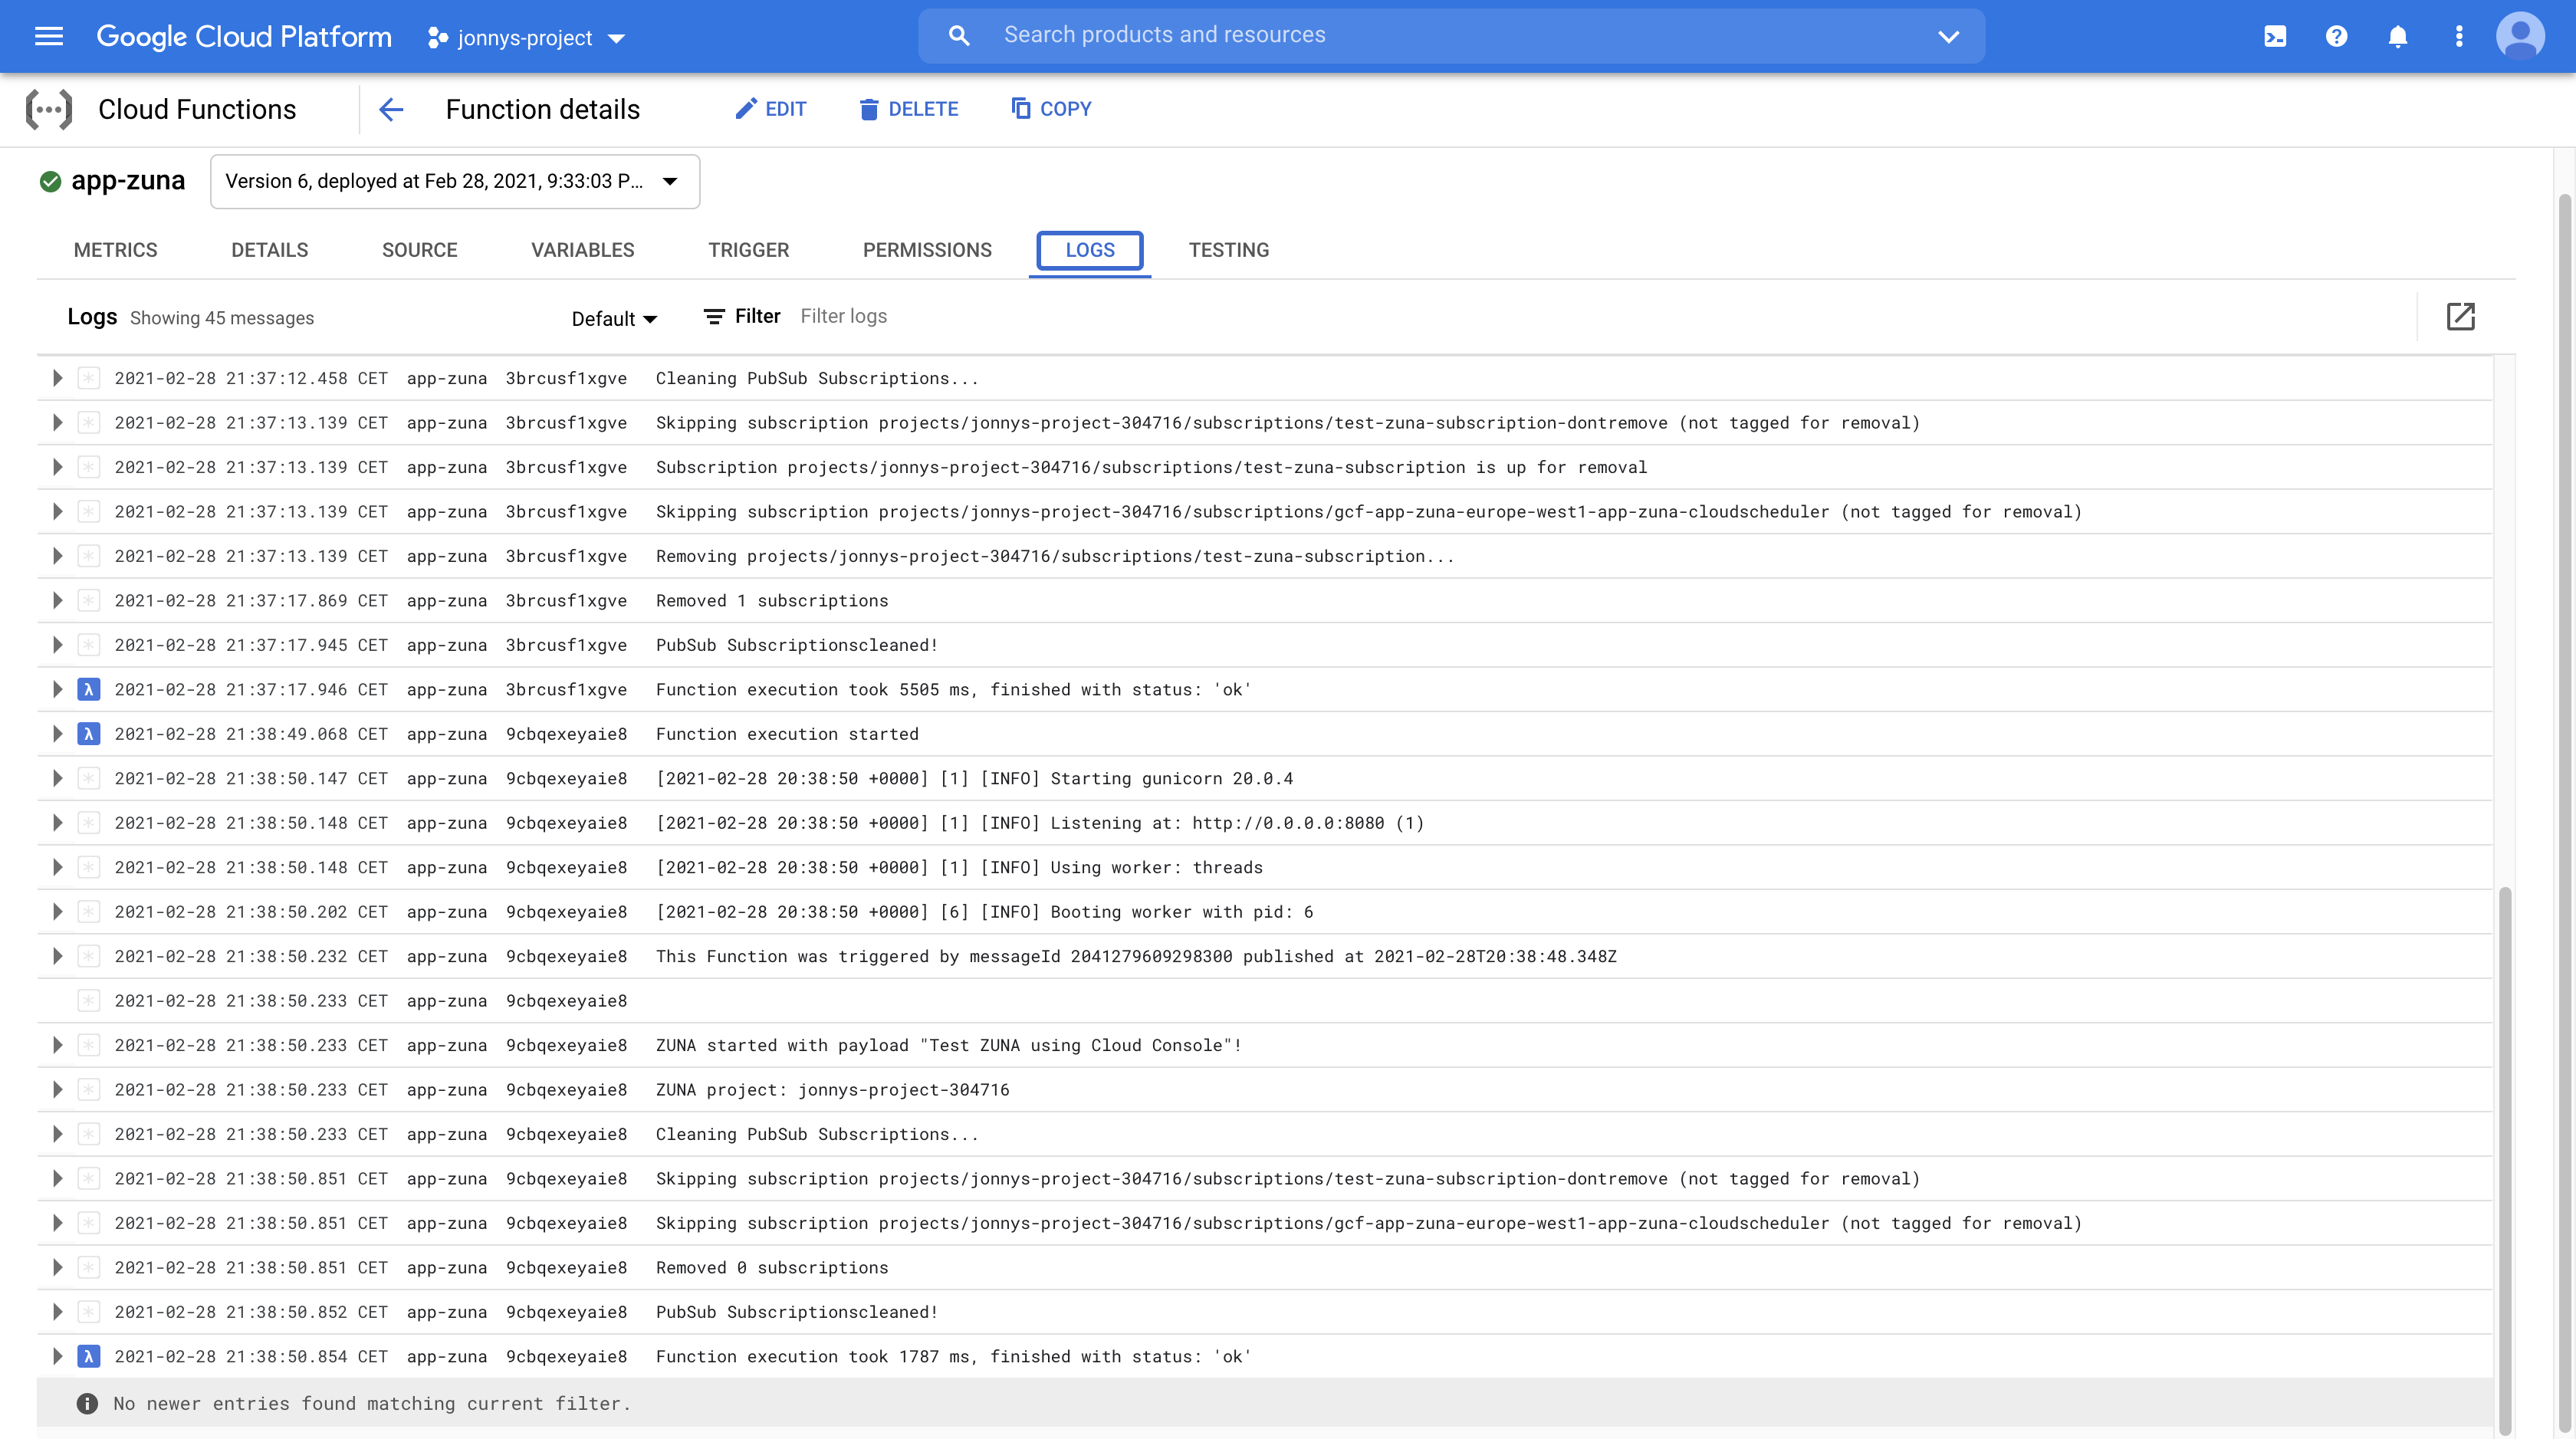
You can view the logs using gcloud:
Or in the Cloud Console:
Logs of our newly deployed Cloud Function.
Notice how our print statements appear in the output:
the Pub/Sub message payload is logged, as well as the informational messages
about which subscriptions have been deleted.
Step 5: Automate the Process
We now have a fully functioning cleanup system; the only missing piece is automation.
For this, we employ Cloud Scheduler, which is a managed cron-service,
for those of you who are familiar with it.
In this script, we create a new scheduled “job” that will publish the specified message
to the Pub/Sub topic that our Cloud Function is listening to.
Note that the timezone is set specifically for my use case.
Omitting this would make it default to Etc/UTC.
Hence, you might want to change this to accommodate your needs.
The TZ database names on this page
should be used.
When creating the job, you might get a message that your project does not have an App Engine app
yet. You should create one before continuing2, but make sure you choose the correct region.
Your output of the Cloud Scheduler job creation should look like this:
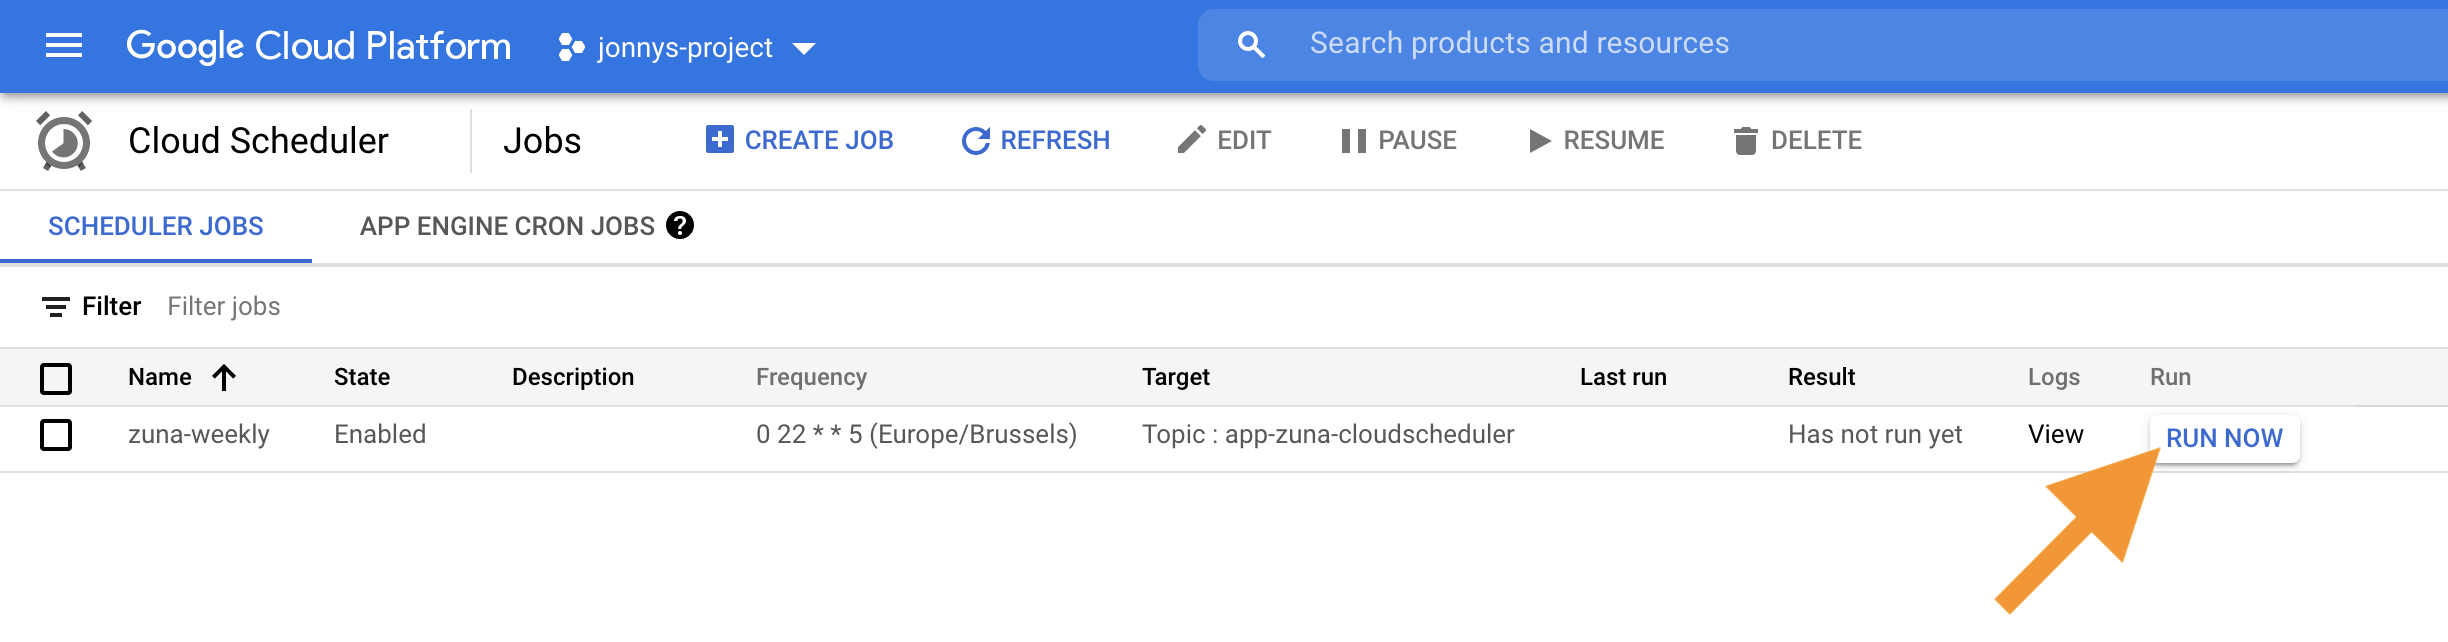
Every Friday, this scheduler will trigger. But, we get the additional benefit of manual triggering.
Option 1 is the following gcloud command:
Option 2 is via the UI, where we get a nice RUN NOW button:
Our Cloud Scheduler job, complete with a “RUN NOW” button.
Both options are great when you’d like to perform that occasional manual cleanup.
After execution, you should see the new output in your Cloud Function’s logs.
Triggering a cleanup during a test run (e.g., integration tests) of your system
might fail your tests unexpectedly.
Moreover, Friday evening might not make sense for your setup if it can break things.
You don’t want to get a weekly alert when you’re enjoying your evening. Be careful!
Step 6: Cleanup
Well, when you’re done testing this, you should cleanup, right?
The following script contains the gcloud commands
to cleanup the resources that were created above:
Some of the resources, such as service accounts or custom roles, might cause issues
when you re-create them soon after deletion as their internal counterpart is not immediately deleted.
That’s it. You’re all done now! Go and enjoy the time you gained,
or continue reading to find out how much this setup will cost you.
Pricing
At the beginning of this tutorial, we stated that we chose these specific services
to help keep the costs low. Let’s investigate the cost model
to verify this is the case.
Cloud Scheduler
Cloud Scheduler has three free jobs per month per billing account ($0.10 per additional job). [source]
Cloud Functions
Cloud Functions has 2M free invocations per billing account ($0.40 per 1M additional invocations + resource cost).
We would have around four function calls per month for our use case, which is negligible.
Note that at the time of writing, the default memory of a Cloud Function is set to 256MB,
which we can tune down to 128MB using the deployment flag --memory=128. This adjustment will make every
invocation even cheaper. [source]
Cloud Pub/Sub
The first 10 gigabytes for Pub/Sub are free ($40 per additional TiB).
Even as the messages are counted as 1000 bytes minimum, we are still in the ballpark of a few
kilobytes per month. So again, a negligible cost. [source]
Hence, even for a setup where the free tiers
are not applicable anymore, we don’t expect a cost
that is higher than $0.20 per month.
Next Steps
Adding more resource types would definitely be useful. Checkout the ZUNA repository3
for hooks to cleanup Dataflow jobs, Pub/Sub topics, BigQuery datasets & tables, etc.
You could check when certain resources were created and build in an expiration time.
This will significantly reduce the risk of interfering with test runs.
It’s also good to know that some services have expiration built-in4
Terraforming this setup is also a good idea. In that case, it could
automatically be part of your deployment pipeline.
Conclusion
We’ve set up a Cloud Function that scans your current project
for resources labeled with autodelete: true and removes them.
The Cloud Function only has limited permissions and
is triggered periodically using Cloud Scheduler
and a Pub/Sub topic.
We succeeded in building an automatic system that we can also
trigger manually. It’s flexible as we can easily add code to
clean up other types of resources.
It was quick to set up, especially since we kept the bash scripts
(although terraforming it would be nice). The cost
is low as the service usage is minimal,
and all services use a pay-as-you-go model.
Using this setup will probably keep you in the free tier.
Finally, since the components that we used are generic,
the resulting setup translates directly into a helpful blueprint
for countless other automation use cases.
 Mar 28, 2021
12 min read
Mar 28, 2021
12 min read